 |
| Clippies! |
While dressing Zara the other day, I noticed a few holes in her hair clip collection. She was missing a brown one (her last brown one was lost on a shopping trip), a lavender one (different shopping trip, same ending), and a yellow one (guess where the last yellow one went). That kid tends to go through a lot, and I mean a lot, of hair clips. Luckily for her, she has a mother who loves to make them.
Ingredients:
- Hair clip base
- Ribbons
- Hot glue gun & sticks
- Scissors
- Craft stick (optional)
 |
| Ingredients |
I'm classifying these as Super Simple. They really are. I tend to do a base and then decorate it however I want. I use a grosgrain ribbon for the base. These are all done with white, but use whatever you like. I like the grosgrain because it tends to grip the hair better than a satin ribbon.
Start by figuring out how much ribbon you'll need for your base. I hate measuring, so I just put one end in the clip, run the ribbon around the whole clip and around the other side. I dovetail the ribbon to keep it from fraying. Put a bead of glue on one end of the ribbon, about the length of the clip arm. I don't know that it's actually called an arm, but it sounds good to me. Gluing just a bit at a time carefully place the ribbon all the way around the clip and on the inside. Be very careful to avoid the mechanism.
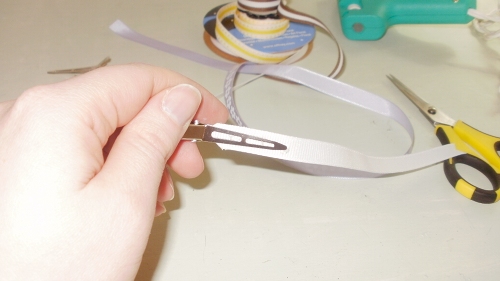 |
| Be very careful with the hot glue. |
Your base is done. It's time for the fun part.
 |
| A fully covered clip base. |
I did a basic bow for the lavender clip. I started out with a length of ribbon and glued the ends together to make a loop.
 |
| Loopy! |
Add a drop of glue to the inside of the overlapped portion and push down the top. This will generally make your bow loops even without having to measure.
 |
| Bow loopy. |
Cut a short length of ribbon to make the center. Glue it on the back. That didn't really need to be said. You're brighter than that.
 |
| Starting the center of the bow. |
Your bow is finished, so glue it on the base. Done!
 |
| Finished lavender hair clip. |
The brown one is even easier. Tie a pretty knot in the center of a brown ribbon. Trim the edges on an angle to avoid fraying. Glue the whole thing on a base. Easy!
 |
| Clip Base + Knotted Ribbon = (see below) |
 |
| A knotted ribbon hair clip |
The yellow one is a bit different from the lavender one. I turned the ends of the ribbon in on itself and glued them down separately.
 |
| How to make a twisty bow. |
 |
| Both ends glued down. The hot glue strings are unnecessary. |
Glue a short length of ribbon around the center to complete the bow and glue the whole thing on a base. Finished!
 |
| Pretty in yellow. |
This last part is optional. I've found it easier to keep the clips in Zara's hair if I do this one little trick. I run a bead of glue on the inside of the clips, both sides, and then use a craft stick to rough it up and spread it out. It gives the clip a bit more traction on her slippery hair. It's not pretty, but it works and no one will ever see that part.

No comments:
Post a Comment
Thanks for stopping by. I'd love to hear from you.