 |
| Happy Valentine's Day! Love, My Front Door |
Well, not so much the day itself. But I love, love, love all things pink and over-the-top girly. Valentine's Day is one of those days where I can cover everything in glittery hearts and no one will raise an eyebrow. It's kind of Liberace meets Glinda the Good Witch. Gotta love that. My first project to actually be finished for Valentine's Day is the wreath for my front door. The hook over the door was getting lonely hanging there on it's own since Christmas.
Ingredients:
- Grapevine wreath form
- Wide wire ribbon
- Thinner ribbons (variety)
- Felt
- Felt stickers
- Glue gun & glue sticks
- Wire (25 gauge floral wire)
- Salt dough hearts
- Acrylic paint (white, silver, antique gold)
- Mod Podge (or your favorite sealer)
- Foam paint brushes
- Scissors
This wreath started out with a trip to the Dollar Tree to pick up some ribbon. Believe it or not, I didn't have anything appropriate in my (embarrassingly large) collection except for the thin gingham. Everything else I had on hand, so the grand total for this project was $2.
I had had an idea a few months back. You may remember these salt dough hearts from my post a while back on Crafting with Kids. I thought they would be adorable as some sort of wall hanging or mobile. Turns out, they were perfect for my new wreath.
They got a good coat of acrylic paint. I used white, antique gold, and silver so they wouldn't be holiday specific. I have plans for these little guys after Valentine's Day. I found that using sponge brushes worked better than bristle brushes at getting in all the little crevices. Let them dry well. Don't rush this part.
 |
| Natural's nice, but painted is better. |
I then gave them two coats of Mod Podge in matte letting them completely dry in between coats.
 |
| What did people do before Mod Podge? |
While the hearts were drying, I got started on the other decorations. I started out with felt squares. I cut a bunch, but only needed three.
 |
| I went a little overboard with the felt squares. |
I then cut up some ribbon into three inch segments. Each rosette took eight pieces of ribbon. Fold each ribbon into half so that the ends touch and tack them together with a dot of hot glue.
 |
| Ignore the bad manicure. Crafting is so hard on the nails. |
To assemble the rosettes, begin by hot gluing the ribbon loops to a felt square in a North, South, East, West configuration. This helps with the spacing.
 |
| A ribbon compass. Don't take it camping. |
Fill in with the other loops.
 |
| Scrapbooking supplies - not just for scrapbooking anymore. |
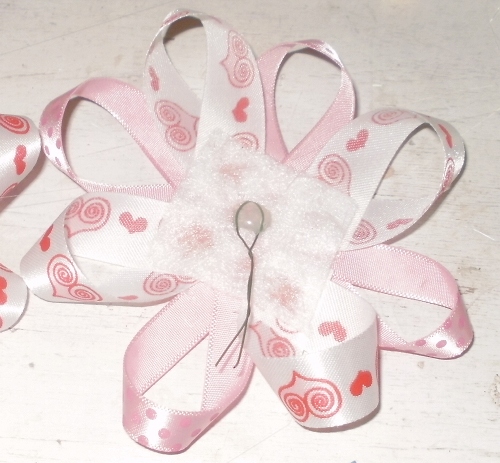
I had these awesome felt stickers on hand and they were perfect to use as the centers of the rosettes.
 |
| A finished rosette. |
Cut three pieces of wire. I used 25 gauge floral wire. Bend them in half and give them a bit of a twist to make a loop. Hot glue the wire loops to the back of the rosettes. The wire will fasten your rosette to the wreath. Everything will be removable so that the wreath form can be reused for the next occasion. This saves a lot of space in storage.
 |
| What did people do before hot glue guns? |
To make the large ribbon rosette, cut off a largish section of wired ribbon. Six to ten inches should do it. Crimp one end of the wire, grab the other end of the same wire and bunch down the fabric. Even out the gathers as you go along and be very careful with the crimped end. You don't want to pull the wire out completely. Gather the ribbon into a circular, overlapping shape and hold it all together with small dots of hot glue. Trim the exposed wire to a few inches so that it can be used to hold the rosette on the wreath. Add another decorative felt sticker to the center.
 |
| This part is a lot more fun than it looks. |
Now it's time to dress that bare wreath.
 |
| A grapevine wreath form. |
Start by loosely wrapping the wreath with wired ribbon. Just tuck the ends in so the ribbon will be easily removed after the holiday. Then wire your rosettes onto the wreath. The final thing to do (and for some strange reason I didn't get photos of this step) is to string the salt dough hearts onto a thin ribbon and tie onto one of the vines so that they hang in the center. I used two ribbons for the three hearts, one much longer than the other so they could double up.
 |
| A ribbon-wrapped grapevine wreath form. |
And that's it. Hang it. Love it.
 |
| Forget the sleeve. I've got my heart on a door. |
Awww, it's so pretty! I'm especially loving the salt dough hearts ... hmmmm, I may try my hand at making a few of those myself. You've inspired me! Thanks for sharing!
ReplyDeleteThanks so much! That's the best thing anyone can hear - that they've inspired someone.
ReplyDelete